How to use motion capture on ARKit to compute posture angle
ARKit extends the application use cases. In a recent one, we leverage the power of a cutting-edge technology provided by ARKit3. The human motion capture. The goal of this development is to detect good/bad posture at work. We will mainly focus on the angle between the back and the thighs.
Motion capture on iOS
Posture at work
There are several studies about it, and we will start from this BBC article. It's the this study that convince me the most.
Do not take this article as a state of art about posture at work. From what I found, there are some articles that says that the best angle between the torso and thigh is 90°. Other studies say that it is better to have an angle between than 90° and 120°. In this article we will only focus on the study of Dr Waseem Bashir.
Dr Waseem Bashir of the Department of Radiology and Diagnostic Imaging at the University of Alberta Hospital, Canada, who led the study, said: "Sitting in a sound anatomic position is essential, since the strain put on the spine and its associated ligaments over time can lead to pain, deformity and chronic illness." "As to what is the best angle between thigh and torso when seated, reclining at 135 degrees can make sitting more difficult as there is a tendency to slide off the seat: 120 degrees or less may be better."
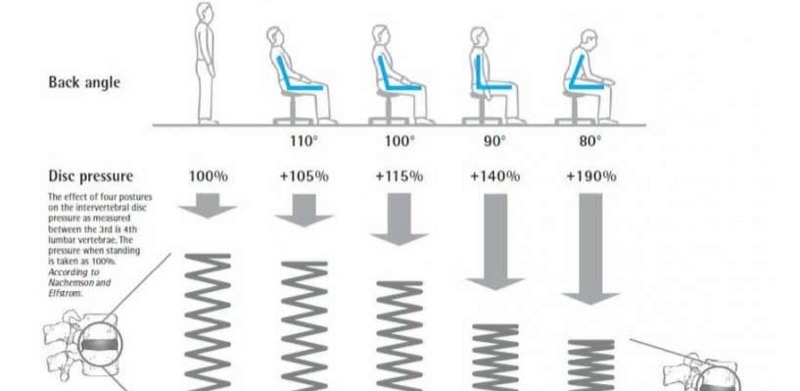
Posture and consequences on disc pressure.
Motion Capture on iOS
Which devices are eligible?
Even if only a subpart of Apple devices can run this technology, it represents millions of devices...
The minimal target version is iOS 13 with A12 chip on it:
- iPhone XS, XS MAX,
- iPhone XR
- iPhone 11, 11 Pro, 11 Pro Max
- iPad with A12 chip
- next generations...
// If the iOS device doesn't support body tracking,
// raise a developer error for this unhandled case.
guard ARBodyTrackingConfiguration.isSupported else {
            fatalError("This feature is only supported on devices with an A12 chip")
}
Features and limitations
With ARKit3 we can now track a single person in real time and retrieve the transformations of the joints in the camera feed. Only the back camera can be used for motion capture. Only a sub-part of the ARSkeleton3D joints are found from the camera feed. The other joints are here to ease the mapping between your application rigged mesh and the ARSkeleton3D.
The SDK provides multiple kind of ARAnchor:
- The ARBodyAnchor, with which ARKit tracks the motion of a single person.
- The ARPlaneAnchor, with which ARKit tracks flat surface.
- The ARObjectAnchor, with which ARKit tracks real-world 3D objects. Use the RealityComposer application to create and export ARobjectAnchor asset.
- The ARImageAnchor, with which ARKit tracks real-world images.
- The ARFaceAnchor, with which ARKit tracks pose, topology and expression of human face. ARKit use the front built-in camera for this anchor.
ARKit uses delegation on your ARSCNView to feed your application with data about the skeleton.
arView.delegate = self
//MARK: - ARSCNViewDelegate
func renderer(_ renderer: SCNSceneRenderer,
				didUpdate node: SCNNode,
				for anchor: ARAnchor) {
        if let anchor = anchor as? ARBodyAnchor{
            let arSkeleton = anchor.skeleton
            //Do stuff
        }
}
Speed up your development
For development, I massively used Record and Replay feature of Xcode.
And why don't we use RealityKit?
I tried to retrieve the joint information from RealityKit framework, but I didn't find a solution. If someone has a solution, I will be glad to hear about it.
The 3D skeleton
Retrieve data joint from the ARBodyAnchor
From the ARSkeleton3D object, we can get the 4x4 transformation matrix:
- Of a named joint in the root referential of the skeleton.
- Of a named joint in the parent hierarchy.
//Get the 4x4 matrix transformation of the spine_7_joint in the hip_joint referential
let spine7 = anchor.skeleton.modelTransform(for: ARSkeleton.JointName(rawValue:"spine_7_joint"))
//Get the 4x4 matrix transformation of the spine_7_joint in its parent referential (spine_6_joint)
let spine7 = anchor.skeleton.localTransform(for: ARSkeleton.JointName(rawValue:"spine_7_joint"))
Rigged mesh and relationship with ARBodyAnchor
The next picture is a snapshot in the SceneKit Scene editor of a rigged 3D mesh provided by Apple in their demonstration. It's the robot.usdz model. All the joints in this skeleton hierarchy are also the name of a joint provided by the ARSkeleton3D. For our use case, we will focus on the left leg joint and the spine 7 joint.
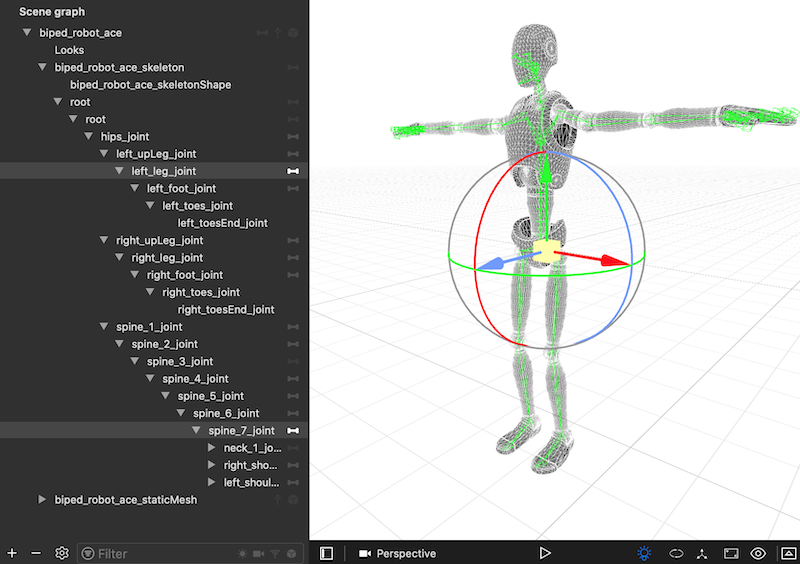
Rigged mesh for ARSkeleton3D.
Retrieve the joints and compute the back/thigh angle
The goal of this use case is to give feedback through two channels:
- Display the angle in a UILabel. The label is a child of the ARSCNView.
- Display a 3D representation of the angle in the video stream.
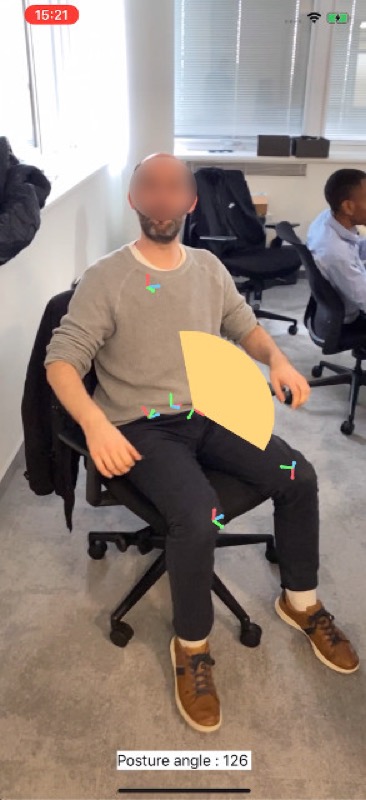
Back angle feedback
The 3D representation of the angle is a circular arc. The geometry is recreated at each update, surely not the most efficient way...). The geometry is a SCNShape build with a UIBezierPath. The node is displayed in green if the posture angle is between 90 and 120 degrees, in orange otherwise.
To compute the angle between two 3D nodes, I use this basic operation on 3D vectors:
///Get angle in radian
static func angleBetween(_ v1:SCNVector3, _ v2:SCNVector3)->Float{
    let cosinus = SCNVector3.dotProduct(left: v1, right: v2) / v1.length() / v2.length()
    let angle = acos(cosinus)
    return angle
}
/// Computes the dot product between two SCNVector3 vectors
static func dotProduct(left: SCNVector3, right: SCNVector3) -> Float {
    return left.x * right.x + left.y * right.y + left.z * right.z
}
We get the left leg joint and the spine 7 joint in the root skeleton referential. Then, we compute the angle, and we attach the circular arc geometry and apply the transformation.
//MARK: - ARSCNViewDelegate
func renderer(_ renderer: SCNSceneRenderer,
				didUpdate node: SCNNode,
				for anchor: ARAnchor) {
        if let anchor = anchor as? ARBodyAnchor{
            let arSkeleton = anchor.skeleton

            //Get the 4x4 matrix transformation from the hip node.
            let upLeg = arSkeleton.modelTransform(for: ARSkeleton.JointName(rawValue: "left_upLeg_joint"))
            let leg = arSkeleton.modelTransform(for: ARSkeleton.JointName(rawValue: "left_leg_joint"))
            let spine7 = arSkeleton.modelTransform(for: ARSkeleton.JointName(rawValue:"spine_7_joint"))
            let matrix1 = SCNMatrix4(upLeg!)
            let matrix2 = SCNMatrix4(spine7!)
            let matrix3 = SCNMatrix4(leg!)
            let legPosition = matrix3.position
            let spine7Position = matrix2.position

            //Compute the angle made by leg joint and spine7 joint
            //from the hip_joint (root node of the skeleton)
            let angle = SCNVector3.angleBetween(legPosition, spine7Position)
            //print("angle : ", angle * 180.0 / Float.pi)

            //Add my geometry node
            node.addChildNode(angleNode)
            angleNode.transform = matrix1
            //Apply a local rotation for display in the good orientation.
            angleNode.transform = SCNMatrix4Mult(SCNMatrix4MakeRotation(Float.pi, 1, 0, 0), angleNode.transform)
            angleNode.scale = SCNVector3(0.3, 0.3, 0.3)

            //Update the color display depending on the posture angle
            var color = UIColor.flora
            if(angle < Float.pi / 2.0){//90°
                color = UIColor.cantaloupe
            }
            if(angle > Float.pi * 2.0 / 3.0){//120°
                color = UIColor.cantaloupe
            }

            //Update the geometry of the feedback node
            nodeUpdater.updateDebugAngle(node: &angleNode,
                                         startAngle: 0,
                                         stopAngle: CGFloat(angle))
            nodeUpdater.setOnlyEmissiveColor(to: angleNode, with: color)
            angleNode.geometry?.materials.first?.isDoubleSided = true

            DispatchQueue.main.async { [weak self] in
                self?.informationView.text = "Posture angle : \(Int(angle * 180.0 / Float.pi ))"
            }
        }
Tada!
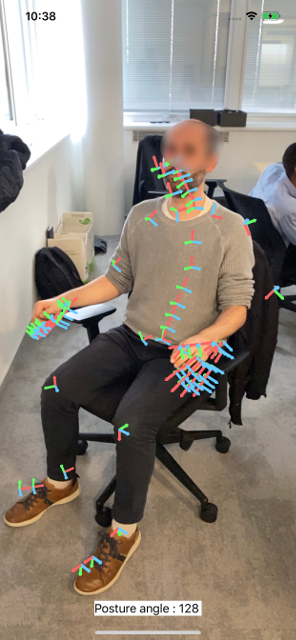
The following video had been recorded on an iPhone XS Max. The angle is computed in real time. The tracking is not perfect, so don't use this technology if you want very accurate data. Otherwise, it's enough for a lot of use cases.

Compute the posture angle and display it on the camera live stream.