MVC Composition (Part 3)
In this third post about MVC Composition i use a Medium article from Alfian Losari as a starting point:
This article is interesting because it takes a classic MVC App that displays movie information from https://www.themoviedb.org and refactors it as an MVVM Application with RxSwift.
So what we'll see is how to write the same application using MVC-Composition architecture.
This way we can compare the 3 architectures for the same project:
- Classic MVC
- MVVM + RxSwift
- MVC-Composition
The code for the following article can be found in this repository:
https://github.com/giln/MVC-Composition-Part3.git
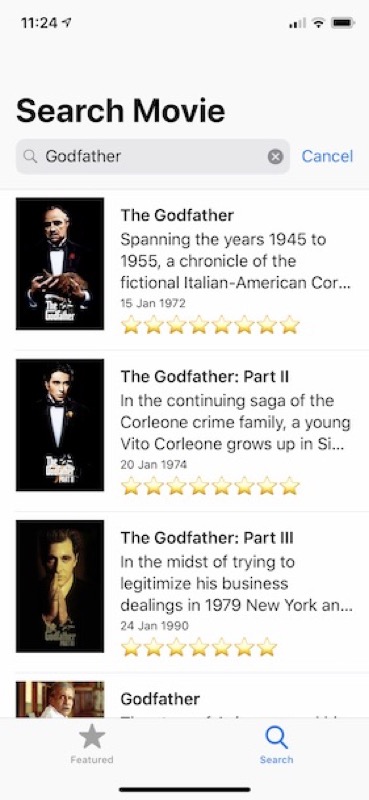
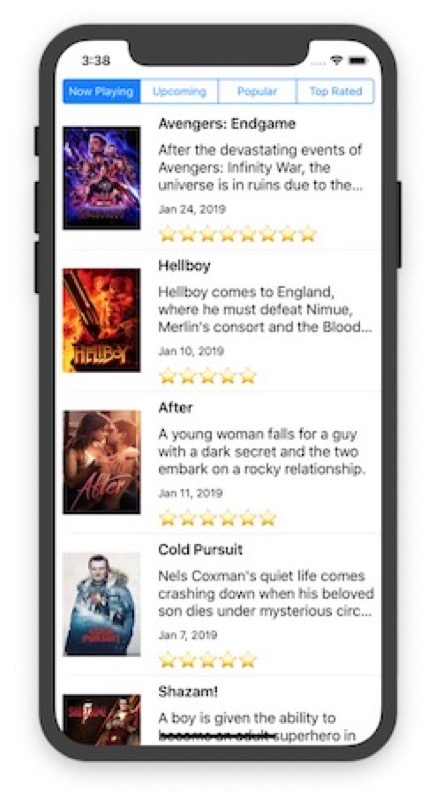
This application has two main screens:
- a "Featured" screen that displays Movies in different categories:
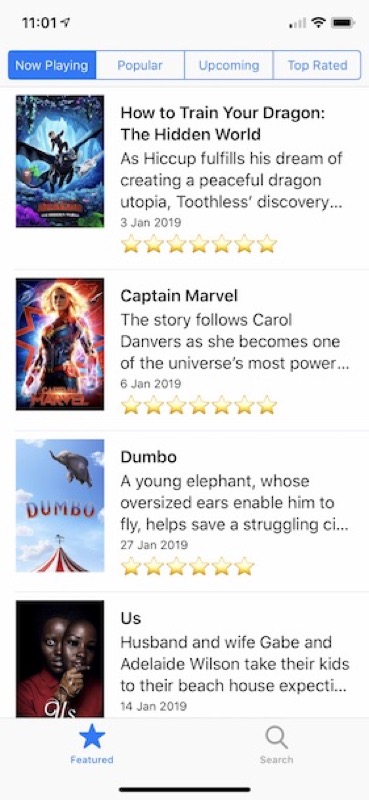
- a "Search" screen that searching for movies:
To get started, clone the repository and switch to the "start" branch:
https://github.com/giln/MVC-Composition-Part3/tree/start
If you open the project with Xcode and try to compile, you get an error:
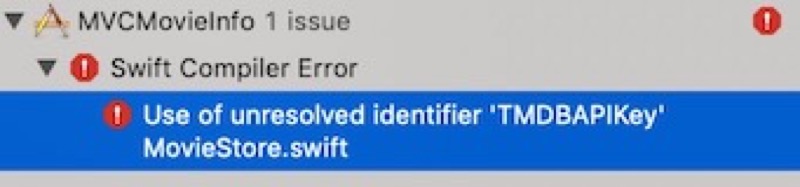
Before you can compile, you need to get an API Key from https://developers.themoviedb.org/3/
You need to register then click on the "API" link from within your account settings page. It is quite fast and only takes a couple of minutes.
Once you have your API Key, you just need to create a TMDBAPIKey.swift file in the Classes/Model directory of the project with the following content:
// Replace with your API Key
let TMDBAPIKey = "XXXXXXXXXXXXX"
Once it's done the project should compile without error.
At this point the project only contains the model and service classes which i copied directly from Alfian Losari project and a few helper classes i use.
One of the most important Helper class is the UIViewController+Container extension:
import UIKit

/// Extension used to facilitate adding child viewControllers in a viewController
public extension UIViewController {
    /// Embeds a view controller and also adds it's view in the view hierarchay
    ///
    /// - Parameter viewController: ViewController to add
    func add(asChildViewController viewController: UIViewController, anchored: Bool = true, subview: UIView? = nil) {
        let someView: UIView = subview ?? view

        // Add Child View Controller
        addChild(viewController)

        // Add Child View as Subview
        someView.addSubview(viewController.view)

        if anchored {
            // Embeded viewControllers should not use safeAnchors
            someView.anchor(view: viewController.view, useSafeAnchors: false)
        }

        // Notify Child View Controller after
        viewController.didMove(toParent: self)
    }

    /// Removes a view controller from both view controller and view hierachies
    ///
    /// - Parameter viewControllerToRemove: ViewController to remove
    func remove(viewControllerToRemove: UIViewController?) {
        guard let viewController = viewControllerToRemove else {
            return
        }

        // Notify Child View Controller before
        viewController.willMove(toParent: nil)

        // Remove View
        viewController.view.removeFromSuperview()

        // Remove ViewController
        viewController.removeFromParent()
    }
}
To understand how this extension works, please refer to my first post on MVC-Composition
The project is also configured with a "MVCMovieInfoFramework" target that contains all model classes from project and allows using them from within Xcode playgrounds. You can refer to my Playground Driven Development serie to get a better understand of how it works.
To test it, open the Blank.playground file at top of project:
import PlaygroundSupport
import UIKit

@testable import MVCMovieInfoFramework

NSSetUncaughtExceptionHandler { exception in
    print("💥 Exception thrown: \(exception)")
}

PlaygroundPage.current.needsIndefiniteExecution = true


let movieStore = MovieStore.shared

movieStore.fetchMovies(from: .topRated, params: nil, successHandler: { moviesResponse in
    print(moviesResponse)
}) { error in
    print(error)
}
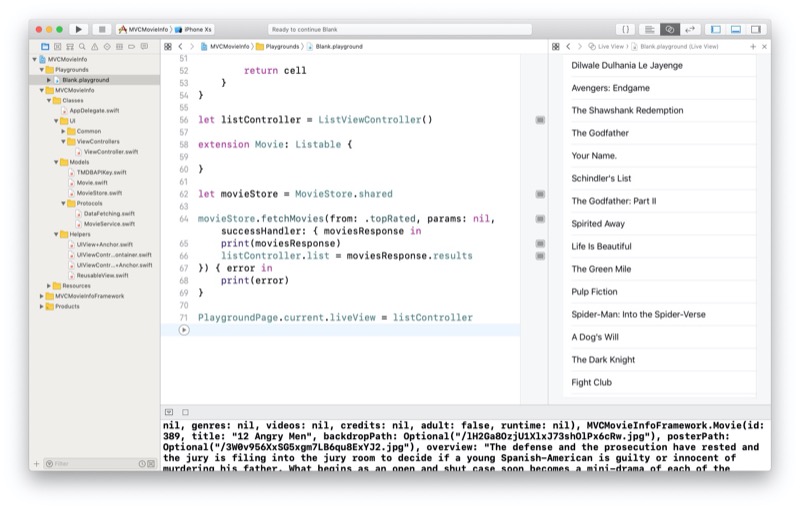
If you run your playground it should fetch the Top rated movies using the MovieStore and print them to the console.
From there we'll start building our application using "Playgrounds driven development".
We start by creating a simple ListViewController class in our Playground:
import PlaygroundSupport
import UIKit

@testable import MVCMovieInfoFramework

NSSetUncaughtExceptionHandler { exception in
    print("💥 Exception thrown: \(exception)")
}

PlaygroundPage.current.needsIndefiniteExecution = true

public protocol Listable {
    var title: String { get }
}

open class ListViewController: UITableViewController {
    // MARK: - Variables
    open var list = [Listable]() {
        didSet {
            tableView.reloadData()
        }
    }

    // MARK: Lifecycle
    open override func viewDidLoad() {
        super.viewDidLoad()

        setupTableView()
    }

    private func setupTableView() {
        tableView.tableFooterView = UIView()
        tableView.register(UITableViewCell.self, forCellReuseIdentifier: UITableViewCell.defaultReuseIdentifier)
        tableView.rowHeight = UITableView.automaticDimension
    }

    // MARK: - TableViewDataSource
    open override func tableView(_: UITableView, numberOfRowsInSection _: Int) -> Int {
        return list.count
    }

    open override func tableView(_ tableView: UITableView, cellForRowAt indexPath: IndexPath) -> UITableViewCell {

        let cell = tableView.dequeueReusableCell(withIdentifier: UITableViewCell.defaultReuseIdentifier, for: indexPath)

        let element = list[indexPath.row]
        cell.textLabel?.text = element.title

        return cell
    }
}

let listController = ListViewController()

extension Movie: Listable {

}

let movieStore = MovieStore.shared

movieStore.fetchMovies(from: .topRated, params: nil, successHandler: { moviesResponse in
    print(moviesResponse)
    listController.list = moviesResponse.results
}) { error in
    print(error)
}

PlaygroundPage.current.liveView = listController
This class is a simple UITableViewController. It's single responsibility is to display a list of Movies. But what's important is that we create a "Listable" Protocol to decouple our ListViewController from the model.
public protocol Listable {
    var title: String { get }
}
This way we can achieve a better reusability of our ListViewController. Also you can see that the ListViewController does not fetch any data. It's not it's reponsibility. It just reloads the tableView every time it receives an array of "Listable":
open var list = [Listable]() {
    didSet {
        tableView.reloadData()
    }
}
The code at the end of our playground allows us to test our viewController. Open Live View using assistant editor and run your playground:
To run correctly you see that we had to make our Movie model conform to the Listable protocol with an extension. The extension at this point is empty because our Movie model already has a "title" property. We see the result in the assistant editor on the right. Also note that the tableview is interactive (scroll etc...).
Next thing we want to do is design a better cell for the table view. We need a way to download images for the movie posters. Original project from Alfian Losari uses Kingfisher but i use my own class (DownloadImageView) to avoid dependencies:
import UIKit

public class DownloadImageView: UIImageView, DataFetching {

    // MARK: - Variables
    public var placeHolder: UIImage?

    public var url: URL? {
        didSet {
            image = placeHolder
            if let downloadURL = url {
                fetchData(url: downloadURL) { data, _ in

                    guard let data = data else {
                        DispatchQueue.main.async {
                            self.image = self.placeHolder
                        }
                        return
                    }

                    let image = UIImage(data: data)
                    DispatchQueue.main.async {
                        // On vérifie que l'URL n'a pas changé
                        if downloadURL == self.url {
                            self.image = image
                        }
                    }
                }
            }
        }
    }
}
This class uses the DataFetching protocol to make network requests:
import Foundation

public protocol DataFetching {
    func fetchData(url: URL, completion: @escaping (Data?, Error?) -> Void)
}

extension DataFetching {
    public func fetchData(url: URL, completion: @escaping (Data?, Error?) -> Void) {

        let session = URLSession.shared

        session.dataTask(with: url) { (data, response, error) in
            completion(data, error)
            }.resume()

    }
}
After we add both classes in our project, we can start designing our cell in a new Playground:
import PlaygroundSupport
import UIKit
@testable import MVCMovieInfoFramework
open class ImageWithFourLabelView: UIView {
// MARK: - Variables
private let horizontalStackView = UIStackView()
private let verticalStackView = UIStackView()
public let imageView = DownloadImageView()
public let firstLabel = UILabel()
public let secondLabel = UILabel()
public let thirdLabel = UILabel()
public let fourthLabel = UILabel()
// MARK: - Lifecycle
public override init(frame: CGRect) {
super.init(frame: frame)
commonInit()
}
public required init?(coder aDecoder: NSCoder) {
super.init(coder: aDecoder)
commonInit()
}
// MARK: - Private
private func commonInit() {
backgroundColor = UIColor.white
firstLabel.font = UIFont.preferredFont(forTextStyle: .headline)
firstLabel.adjustsFontForContentSizeCategory = true
secondLabel.numberOfLines = 3
thirdLabel.font = UIFont.preferredFont(forTextStyle: .footnote)
thirdLabel.adjustsFontForContentSizeCategory = true
verticalStackView.axis = .vertical
verticalStackView.distribution = .fill
verticalStackView.alignment = .leading
verticalStackView.spacing = 10
horizontalStackView.axis = .horizontal
horizontalStackView.distribution = .fill
horizontalStackView.alignment = .center
horizontalStackView.spacing = 20
horizontalStackView.preservesSuperviewLayoutMargins = true
horizontalStackView.isLayoutMarginsRelativeArrangement = true
addSubview(horizontalStackView)
horizontalStackView.anchor(in: self)
horizontalStackView.addArrangedSubview(imageView)
horizontalStackView.addArrangedSubview(verticalStackView)
imageView.widthAnchor.constraint(equalToConstant: 90).isActive = true
imageView.heightAnchor.constraint(equalToConstant: 120).isActive = true
imageView.backgroundColor = UIColor.black
verticalStackView.addArrangedSubview(firstLabel)
verticalStackView.addArrangedSubview(secondLabel)
verticalStackView.addArrangedSubview(thirdLabel)
verticalStackView.addArrangedSubview(fourthLabel)
}
}
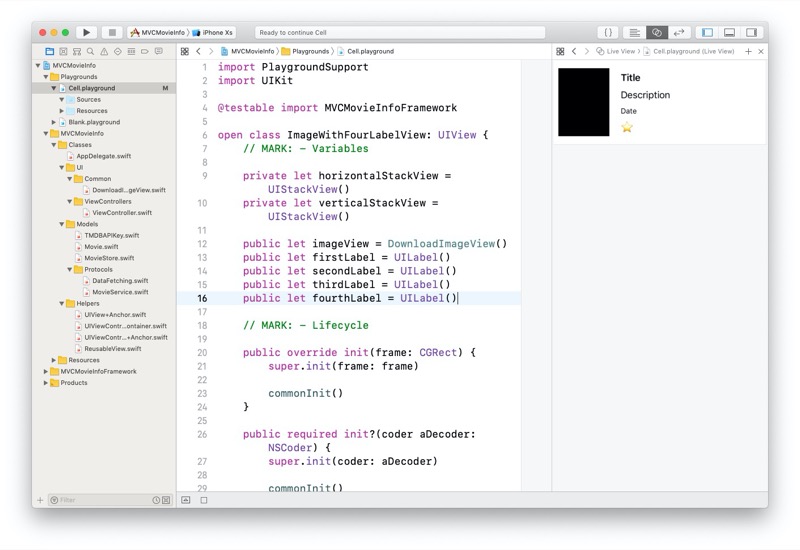
let view = ImageWithFourLabelView(frame: CGRect(x: 0, y: 0, width: 375, height: 150))
view.firstLabel.text = "Title"
view.secondLabel.text = "Description"
view.thirdLabel.text = "Date"
view.fourthLabel.text = "⭐️"
PlaygroundPage.current.liveView = view
As you can see, it's a simple UIView, not a UITableViewCell. This allows better reuse for this view as we can use it in a TableViewCell or in any ViewController. Execute playgrounds to display and test your View Layout:
To use this view from a tableViewCell we just create a TableViewCell to embed it:
import UIKit

open class ImageWithFourLabelCell: UITableViewCell {

    public let layout = ImageWithFourLabelView()

    // MARK: - Lifecycle
    public override init(style: UITableViewCell.CellStyle, reuseIdentifier: String?) {
        super.init(style: style, reuseIdentifier: reuseIdentifier)

        commonInit()
    }
    public required init?(coder aDecoder: NSCoder) {
        super.init(coder: aDecoder)

        commonInit()
    }

    private func commonInit() {
        contentView.addSubview(layout)
        layout.anchor(in: contentView)
    }
}
After adding both classes in our project, we can start to modify our ListViewController to use our new cell:
import PlaygroundSupport
import UIKit
@testable import MVCMovieInfoFramework
NSSetUncaughtExceptionHandler { exception in
print("💥 Exception thrown: \(exception)")
}
PlaygroundPage.current.needsIndefiniteExecution = true
public protocol Listable {
var firstText: String { get }
var secondText: String { get }
var thirdText: String { get }
var fourthText: String { get }
var imageUrl: URL { get }
}
public extension ImageWithFourLabelView {
func configure(with element: Listable) {
firstLabel.text = element.firstText
secondLabel.text = element.secondText
thirdLabel.text = element.thirdText
fourthLabel.text = element.fourthText
imageView.url = element.imageUrl
}
}
open class ListViewController: UITableViewController {
// MARK: - Variables
open var list = [Listable]() {
didSet {
tableView.reloadData()
}
}
// MARK: Lifecycle
open override func viewDidLoad() {
super.viewDidLoad()
setupTableView()
}
private func setupTableView() {
tableView.tableFooterView = UIView()
tableView.register(ImageWithFourLabelCell.self, forCellReuseIdentifier: ImageWithFourLabelCell.defaultReuseIdentifier)
tableView.rowHeight = UITableView.automaticDimension
}
// MARK: - TableViewDataSource
open override func tableView(_: UITableView, numberOfRowsInSection _: Int) -> Int {
return list.count
}
open override func tableView(_ tableView: UITableView, cellForRowAt indexPath: IndexPath) -> UITableViewCell {
let cell = tableView.dequeueReusableCell(withIdentifier: ImageWithFourLabelCell.defaultReuseIdentifier, for: indexPath) as! ImageWithFourLabelCell
let element = list[indexPath.row]
cell.layout.configure(with: element)
return cell
}
}
extension Movie: Listable {
private static let dateFormatter: DateFormatter = {
let formatter = DateFormatter()
formatter.dateStyle = .medium
formatter.timeStyle = .none
return formatter
}()
public var firstText: String {
return title
}
public var secondText: String {
return overview
}
public var thirdText: String {
return Movie.dateFormatter.string(from: releaseDate)
}
public var fourthText: String {
let rating = Int(voteAverage)
let ratingText = (0 ..< rating).reduce("") { (acc, _) -> String in
return acc + "⭐️"
}
return ratingText
}
public var imageUrl: URL {
return posterURL
}
}
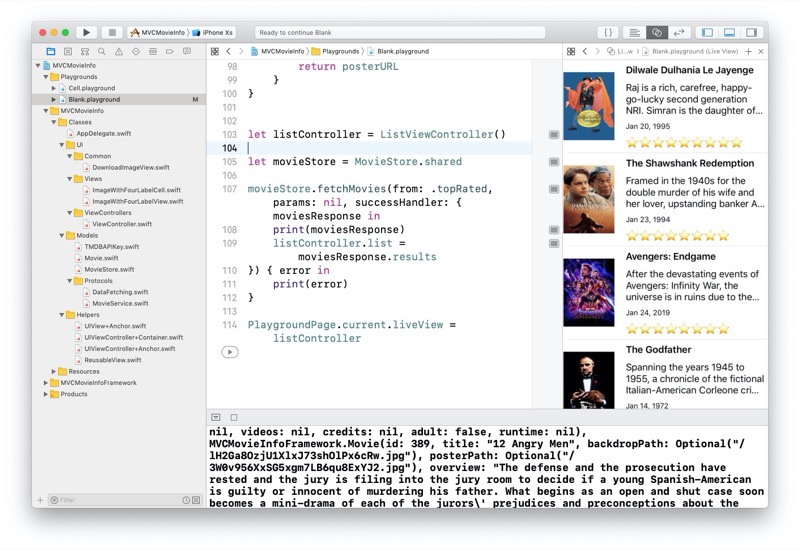
let listController = ListViewController()
let movieStore = MovieStore.shared
movieStore.fetchMovies(from: .topRated, params: nil, successHandler: { moviesResponse in
print(moviesResponse)
listController.list = moviesResponse.results
}) { error in
print(error)
}
PlaygroundPage.current.liveView = listController
You can see we started by modifying our Listable Protocol by adding new variables:
public protocol Listable {
    var firstText: String { get }
    var secondText: String { get }
    var thirdText: String { get }
    var fourthText: String { get }
    var imageUrl: URL { get }
}
This means that our Movie model must conform to Listable protocol before it can be displayed in our TableView:
extension Movie: Listable {
    private static let dateFormatter: DateFormatter = {
        let formatter = DateFormatter()
        formatter.dateStyle = .medium
        formatter.timeStyle = .none
        return formatter
    }()

    public var firstText: String {
        return title
    }

    public var secondText: String {
        return overview
    }

    public var thirdText: String {
        return Movie.dateFormatter.string(from: releaseDate)
    }

    public var fourthText: String {
        let rating = Int(voteAverage)
        let ratingText = (0 ..< rating).reduce("") { (acc, _) -> String in
            return acc + "⭐️"
        }
        return ratingText
    }

    public var imageUrl: URL {
        return posterURL
    }
}
If you look at the above extension, it looks a lot like the code from the ViewModel in the MVVM architecture.
After running our playground we get the following result in the LiveView:
What's nice is that our ListViewController is highly reusable. It can display any model that conforms to the Listable Protocol.
Once we are satisfied with the result from the playground, we just need to copy our classes to our Project and test it from the application.
To test our application it we temporarily move the code that fetches the movies in the AppDelegate:
import UIKit

@UIApplicationMain
class AppDelegate: UIResponder, UIApplicationDelegate {
    var window: UIWindow?

    func application(_: UIApplication, didFinishLaunchingWithOptions _: [UIApplication.LaunchOptionsKey: Any]?) -> Bool {
        window = UIWindow(frame: UIScreen.main.bounds)
        window?.backgroundColor = UIColor.white
        window?.makeKeyAndVisible()

        let listController = ListViewController()

        let movieStore = MovieStore.shared

        movieStore.fetchMovies(from: .topRated, params: nil, successHandler: { moviesResponse in
            print(moviesResponse)
            listController.list = moviesResponse.results
        }) { error in
            print(error)
        }

        window?.rootViewController = listController

        return true
    }
}
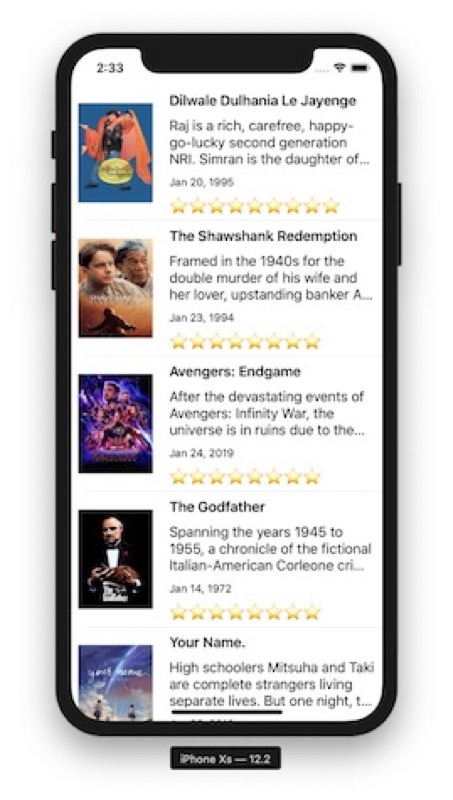
Here is the result in the simulator:
Of course, fetching data is not the responsibility of the AppDelegate, so we create a new MovieFetcherViewController for this:
import UIKit

open class MovieFetcherViewController: UIViewController {
    // MARK: - Variables
    public var movieStore = MovieStore.shared
    private let listController = ListViewController()

    // MARK: - Lifecycle
    open override func viewDidLoad() {
        super.viewDidLoad()

        add(asChildViewController: listController)
    }

    open override func viewWillAppear(_ animated: Bool) {
        super.viewWillAppear(animated)

        movieStore.fetchMovies(from: .topRated, params: nil, successHandler: { [weak self] moviesResponse in

            self?.listController.list = moviesResponse.results
        }) { error in
            print(error)
        }

    }
}
As you can see, the fetchMovies is performed in the viewWillAppear. This is important because it allows us to load our viewController without performing the network request until the ViewController is about to be displayed on screen. This is going to be important for our next View Controller, the SegmentedViewController:
import UIKit

open class SegmentedViewController: UIViewController {

    public private(set) var selectedViewControllerIndex = 0

    // MARK: - Public variables
    /// List of ViewControllers. View Controller Titles are used as segment titles.
    public var items = [UIViewController]() {
        didSet {
            // Remove previous viewControllers
            for previousItem in oldValue {
                self.remove(viewControllerToRemove: previousItem)
            }
            // Remove segments
            segmentedControl.removeAllSegments()

            // Add new segments and first viewController
            for (index, item) in items.enumerated() {
                segmentedControl.insertSegment(withTitle: item.title, at: index, animated: false)

                if index == selectedViewControllerIndex {
                    segmentedControl.selectedSegmentIndex = selectedViewControllerIndex
                    add(asChildViewController: item, anchored: true, subview: containerView)
                }
            }
        }
    }

    // MARK: - Private variables
    private let segmentedControl = UISegmentedControl()
    private let containerView = UIView()
    private let stackView = UIStackView()
    private let topStackView = UIStackView()

    // MARK: - LifeCycle
    open override func viewDidLoad() {
        super.viewDidLoad()

        topStackView.axis = .vertical
        topStackView.alignment = .center
        topStackView.distribution = .equalSpacing
        topStackView.isLayoutMarginsRelativeArrangement = true
        topStackView.preservesSuperviewLayoutMargins = true

        view.backgroundColor = .white
        stackView.axis = .vertical
        stackView.distribution = .fill
        stackView.alignment = .fill
        stackView.spacing = 5

        view.addSubview(stackView)
        view.anchor(view: stackView, useSafeAnchors: false)

        stackView.addArrangedSubview(topStackView)
        topStackView.addArrangedSubview(segmentedControl)
        stackView.addArrangedSubview(containerView)

        segmentedControl.addTarget(self, action: #selector(segmentDidChange(segment:)), for: .valueChanged)
    }

    // MARK: - Actions
    @objc
    private func segmentDidChange(segment: UISegmentedControl) {

        selectController(at: segment.selectedSegmentIndex)

        print(segment.selectedSegmentIndex)
    }

    private func selectController(at index: Int ) {

        let item = items[index]

        add(asChildViewController: item, anchored: true, subview: containerView)
        remove(viewControllerToRemove: items[selectedViewControllerIndex])
        selectedViewControllerIndex = index
    }
}
This SegmentedViewController class displays a list of UIViewControllers stored in the "items" variable. The title of each ViewController is used to create the segments.
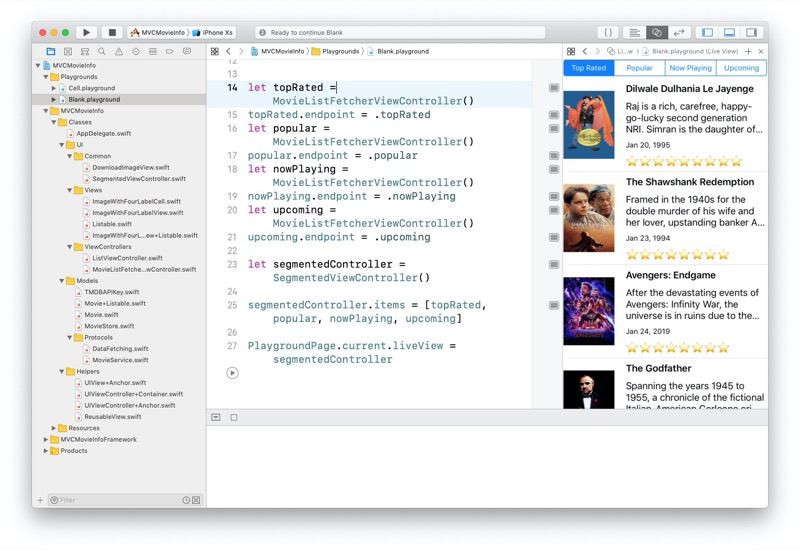
Our final application displays four segments at the top of the screen:
- Now playing
- Popular
- upcoming
- Top Rated
Each segment corresponds to an EndPoint from the MovieStore.
So we modify our MovieListFetcherViewController and Add the endPoint as a parameter to fetch the movies:
import UIKit

open class MovieListFetcherViewController: UIViewController {
    // MARK: - Variables
    public var movieStore = MovieStore.shared
    private let listController = ListViewController()

    public var endpoint: Endpoint = .nowPlaying {
        didSet {
            title = endpoint.description
        }
    }

    // MARK: - Lifecycle
    open override func viewDidLoad() {
        super.viewDidLoad()

        title = endpoint.description
        add(asChildViewController: listController)
    }

    open override func viewWillAppear(_ animated: Bool) {
        super.viewWillAppear(animated)

        movieStore.fetchMovies(from: endpoint, params: nil, successHandler: { [weak self] moviesResponse in

            self?.listController.list = moviesResponse.results
        }) { error in
            print(error)
        }
    }
}
This allows us to instantiate the MovieListFetcherViewController 4 times, each with a different endpoint, and pass all 4 as an Array to our SegmentedViewController. We can test this in our Playground:
We refactor this code in a new MovieListCoordinator view Controller:
import UIKit

open class MovieListCoordinator: UIViewController {
    // MARK: - Variables
    let segmentedController = SegmentedViewController()
    let topMovieFetcherViewController = MovieListFetcherViewController()
    let nowPlayingMovieFetcherViewController = MovieListFetcherViewController()
    let popularMovieFetcherViewController = MovieListFetcherViewController()
    let upcomingMovieFetcherViewController = MovieListFetcherViewController()

    // MARK: - Lifecycle
    open override func viewDidLoad() {
        super.viewDidLoad()

        add(asChildViewController: segmentedController)

        topMovieFetcherViewController.endpoint = .topRated
        nowPlayingMovieFetcherViewController.endpoint = .nowPlaying
        popularMovieFetcherViewController.endpoint = .popular
        upcomingMovieFetcherViewController.endpoint = .upcoming

        segmentedController.items = [nowPlayingMovieFetcherViewController, upcomingMovieFetcherViewController, popularMovieFetcherViewController, topMovieFetcherViewController]
    }
}
To be complete we need to manage errors and loading time. To do this we create an ErrorViewController:
import UIKit

open class ErrorViewController: UIViewController {

    // MARK: - Variables
    public let errorLabel = UILabel()

    // MARK: - Lifecycle
    open override func viewDidLoad() {
        super.viewDidLoad()

        view.backgroundColor = UIColor.white
        errorLabel.numberOfLines = 0
        errorLabel.textAlignment = .center

        view.addSubview(errorLabel)

        errorLabel.anchor(in: view)
    }
}
and a LoadingViewController:
import UIKit

open class LoadingViewController: UIViewController {
    // MARK: - Variables
    public let activityIndicator = UIActivityIndicatorView(style: .gray)

    // MARK: - Lifecycle
    open override func viewDidLoad() {
        super.viewDidLoad()

        view.backgroundColor = UIColor.white
        activityIndicator.hidesWhenStopped = true

        view.addSubview(activityIndicator)

        activityIndicator.center(in: view)
    }

    open override func viewWillAppear(_ animated: Bool) {
        super.viewWillAppear(animated)

        activityIndicator.startAnimating()
    }

    open override func viewWillDisappear(_ animated: Bool) {
        super.viewWillDisappear(animated)

        activityIndicator.stopAnimating()
    }
}
This ViewController just adds a UIActivityIndicator in it's center. The indicators starts animating in the viewWillAppear and stops in the viewWillDisappear.
The responsibility to manage between the loading, error and movie states is done with the ListStateViewController:
import UIKit

open class ListStateViewController: UIViewController {
    public enum State {
        case loading
        case list([Listable])
        case empty(String)
        case error(String)
    }

    // MARK: - Variables
    public var state = State.empty("") {
        didSet {
            switch state {
            case .loading:
                remove(viewControllerToRemove: emptyViewController)
                remove(viewControllerToRemove: errorViewController)
                remove(viewControllerToRemove: listViewController)
                add(asChildViewController: loadingViewController)
            case let .list(list):
                listViewController.list = list
                remove(viewControllerToRemove: emptyViewController)
                remove(viewControllerToRemove: errorViewController)
                remove(viewControllerToRemove: loadingViewController)
                add(asChildViewController: listViewController)
            case let .empty(emptyString):
                emptyViewController.errorLabel.text = emptyString
                remove(viewControllerToRemove: listViewController)
                remove(viewControllerToRemove: errorViewController)
                remove(viewControllerToRemove: loadingViewController)
                add(asChildViewController: emptyViewController)
            case let .error(errorString):
                errorViewController.errorLabel.text = errorString
                remove(viewControllerToRemove: emptyViewController)
                remove(viewControllerToRemove: listViewController)
                remove(viewControllerToRemove: loadingViewController)
                add(asChildViewController: errorViewController)
            }
        }
    }

    private let loadingViewController = LoadingViewController()
    private let emptyViewController = ErrorViewController()
    private let errorViewController = ErrorViewController()
    private let listViewController = ListViewController()

    // MARK: - Lifecycle
    open override func viewDidLoad() {
        super.viewDidLoad()

        addChild(listViewController)
    }
}
To use it we just modify our MovieListFetcherViewController:
import UIKit

open class MovieListFetcherViewController: UIViewController {
    // MARK: - Variables
    public let listStateController = ListStateViewController()

    public let movieStore = MovieStore.shared

    public var endpoint: Endpoint = .nowPlaying {
        didSet {
            title = endpoint.description
        }
    }

    // MARK: - Lifecycle
    open override func viewDidLoad() {
        super.viewDidLoad()

        title = endpoint.description
        add(asChildViewController: listStateController)
    }

    open override func viewWillAppear(_ animated: Bool) {
        super.viewWillAppear(animated)

        listStateController.state = .loading

        movieStore.fetchMovies(from: endpoint, params: nil, successHandler: { moviesResponse in

            self.listStateController.state = .list(moviesResponse.results)
        }) { error in

            self.listStateController.state = .error(error.localizedDescription)
        }
    }
}
As you can see we have a lot of ViewControllers just for a single screen of the application. However all our ViewControllers have a Single Responsibility and most of them are under 50 lines of code. This makes them easy to maintain and reuse.
We are going to see now that we can reuse most of our ViewControllers for the Search part of the application.
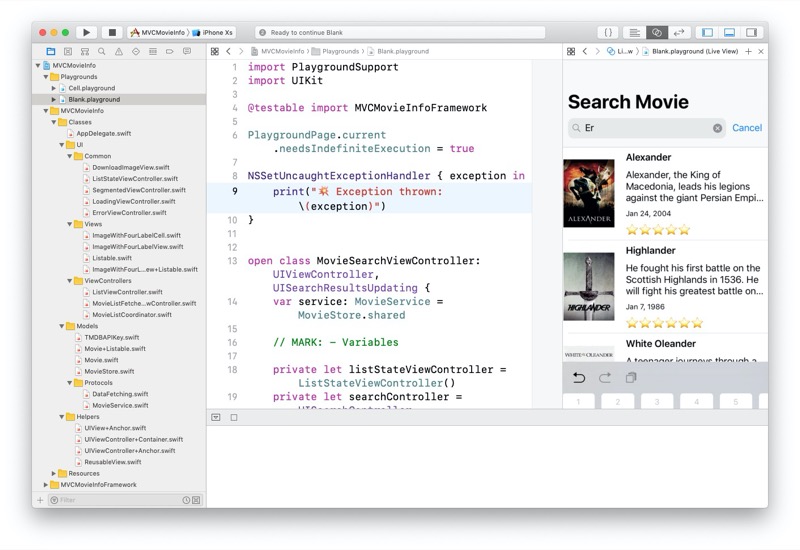
Back to our Playgrounds, we create a new MovieSearchViewController:
import PlaygroundSupport
import UIKit

@testable import MVCMovieInfoFramework

PlaygroundPage.current.needsIndefiniteExecution = true

NSSetUncaughtExceptionHandler { exception in
    print("💥 Exception thrown: \(exception)")
}


open class MovieSearchViewController: UIViewController, UISearchResultsUpdating {
    var service: MovieService = MovieStore.shared

    // MARK: - Variables
    private let listStateViewController = ListStateViewController()
    private let searchController = UISearchController(searchResultsController: nil)

    // MARK: - Lifecycle
    open override func viewDidLoad() {
        super.viewDidLoad()

        title = "Search Movie"
        view.backgroundColor = UIColor.white
        add(asChildViewController: listStateViewController)
        listStateViewController.state = .empty("Start searching your favorite movies")

        setupNavigationBar()
    }

    // MARK: - Private
    private func setupNavigationBar() {
        navigationItem.searchController = searchController
        definesPresentationContext = true

        searchController.searchResultsUpdater = self
        searchController.dimsBackgroundDuringPresentation = false
        searchController.hidesNavigationBarDuringPresentation = false

        navigationItem.hidesSearchBarWhenScrolling = false
        navigationController?.navigationBar.prefersLargeTitles = true
        navigationItem.largeTitleDisplayMode = .automatic
    }

    open func searchMovie(query: String?) {
        guard let query = query, !query.isEmpty else {
            listStateViewController.state = .empty("Start searching your favorite movies")
            return
        }

        listStateViewController.state = .loading

        service.searchMovie(query: query, params: nil, successHandler: {
            [unowned self] response in

            self.listStateViewController.state = .list(response.results)

            }, errorHandler: {
                [unowned self] error in

                self.listStateViewController.state = .error(error.localizedDescription)
        })
    }

    // MARK: - UISearchResultsUpdating
    public func updateSearchResults(for _: UISearchController) {
        searchMovie(query: searchController.searchBar.text)
    }
}


let movieSearch = MovieSearchViewController()
let navigationController = UINavigationController(rootViewController: movieSearch)

PlaygroundPage.current.liveView = navigationController
This ViewController reuses most of our previous ViewControllers (StateViewController, ListViewController...) to display the search results:
However we feel like this ViewController has 2 responsibilities (Displaying and managing the Search Controller and Fetching the data) so we split it into two ViewControllers:
A MovieSearchFetcherViewController whose responsibility is to fetch the data:
import UIKit

open class MovieSearchFetcherViewController: UIViewController {
    var service: MovieService = MovieStore.shared

    // MARK: - Variables
    private let listStateViewController = ListStateViewController()
    private let searchController = UISearchController(searchResultsController: nil)

    // MARK: - Lifecycle
    open override func viewDidLoad() {
        super.viewDidLoad()

        add(asChildViewController: listStateViewController)
        listStateViewController.state = .empty("Start searching your favorite movies")
    }

    // MARK: - Public
    open func searchMovie(query: String?) {
        guard let query = query, !query.isEmpty else {
            listStateViewController.state = .empty("Start searching your favorite movies")
            return
        }

        listStateViewController.state = .loading

        service.searchMovie(query: query, params: nil, successHandler: {
            [unowned self] response in

            self.listStateViewController.state = .list(response.results)

        }, errorHandler: {
            [unowned self] error in

            self.listStateViewController.state = .error(error.localizedDescription)
        })
    }
}
and a MovieSearchViewController whose reponsilibity is to display and manage the Searchbar:
import UIKit

open class MovieSearchViewController: UIViewController, UISearchResultsUpdating {
    var service: MovieService = MovieStore.shared

    // MARK: - Variables
    private let movieSearchFetcherViewController = MovieSearchFetcherViewController()
    private let searchController = UISearchController(searchResultsController: nil)

    // MARK: - Lifecycle
    open override func viewDidLoad() {
        super.viewDidLoad()

        title = "Search Movie"
        view.backgroundColor = UIColor.white
        setupNavigationBar()

        add(asChildViewController: movieSearchFetcherViewController)
    }

    // MARK: - Private
    private func setupNavigationBar() {
        navigationItem.searchController = searchController
        definesPresentationContext = true

        searchController.searchResultsUpdater = self
        searchController.dimsBackgroundDuringPresentation = false
        searchController.hidesNavigationBarDuringPresentation = false

        navigationItem.hidesSearchBarWhenScrolling = false
        navigationController?.navigationBar.prefersLargeTitles = true
        navigationItem.largeTitleDisplayMode = .automatic
    }

    // MARK: - UISearchResultsUpdating
    public func updateSearchResults(for _: UISearchController) {
        movieSearchFetcherViewController.searchMovie(query: searchController.searchBar.text)
    }
}
Now we just need to use a TabBarController to assemble all of this in the AppDelegate (temporarily because it should be moved in a RootViewCoordinator):
import UIKit

@UIApplicationMain
class AppDelegate: UIResponder, UIApplicationDelegate {
    var window: UIWindow?

    func application(_: UIApplication, didFinishLaunchingWithOptions _: [UIApplication.LaunchOptionsKey: Any]?) -> Bool {
        window = UIWindow(frame: UIScreen.main.bounds)
        window?.backgroundColor = UIColor.white
        window?.makeKeyAndVisible()

        let movieListCoordinator = MovieListCoordinator()
        movieListCoordinator.tabBarItem = UITabBarItem(tabBarSystemItem: .featured, tag: 0)

        let searchController = MovieSearchViewController()
        searchController.tabBarItem = UITabBarItem(tabBarSystemItem: .search, tag: 0)
        let navBar = UINavigationController(rootViewController: searchController)

        let tabbarController = UITabBarController()
        tabbarController.viewControllers = [movieListCoordinator, navBar]

        window?.rootViewController = tabbarController

        return true
    }
}
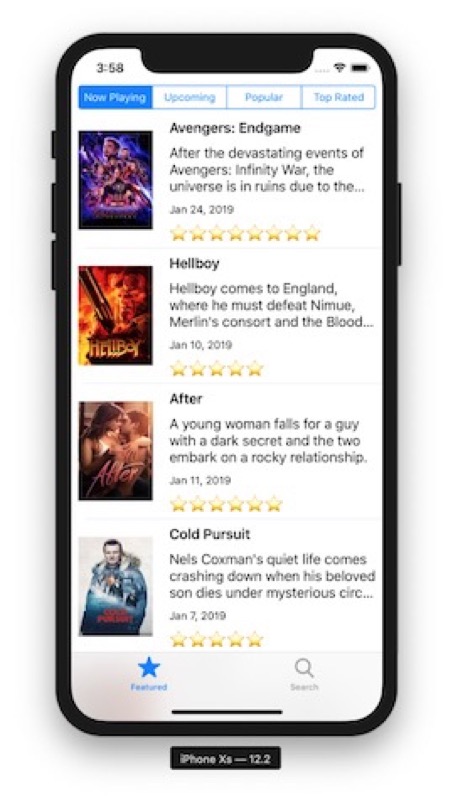
And run the app:
All the code above can be found in the following repository on the branch "FinalResult"
https://github.com/giln/MVC-Composition-Part3.git
The above repository contains one last commit in which i try to make the ListViewController completely generic with any "Configurable" View, but this is beyond the scope of this tutorial.
Thank you and don't hesitate making comments for improvements!