ARKit and CoreML fun
ARKit allows mixing virtual objects and real world environment. In this post we explore how we can make our real hands interact with virtual objects using Machine Learning and CoreML in particular.
The code for the following article can be found in this repository:
https://github.com/giln/ARML.git
Augmented reality is a lot of fun. ARKit from Apple is a really powerfull tool that uses computer vision to analyse your environment and detect features from it. The power lies in the fact that you can use the detected features from the video to anchor virtual objects in the world and give the illusion they are real.
Advanced techniques can make the illusion even stronger: Shadow casting, Physically based rendering, Environment texturing...
Lots of rumors say Apple will release Augmented Reality glasses in a near future. To do this they need to find solutions for a lot of issues. As always Apple is taking time to build things. We can see the how they are slowly building their strategy:
- The release of ARKit, which is compatible with devices up to the iphone 6s. With it, thousands of developers have already started building AR enabled applications. This means that developpers and applications will be ready when Apple finally releases it's glasses.
- The release of the iPhone X with it's front-facing 3D sensors. TrueDepth sensors are already used in ARKit for applications like Animoji. Rumors say that 2019 iphones will have rear-facing TrueDepth sensors. This will be huge because it will allow some great interactions for AR applications.
- The release of the Neural Engine. Here again another piece of essential component is added. Neural engine chip is specialized in computing Neural networks. Neural networks are essential to computer vision, and those specialized chip will also allow some deep environment analysis while not overloading the GPU.
The puzzle is slowly converging to the release of a great Mobile Augmented Reality device from Apple.
With this is mind i was wondering what was still missing and we might be seing in the next few months from Apple.
What we need is a way to interact with virtual objects with our hands. With it's Vision framework, Apple already allows some fun interactions between real world and virtual objects (detect and track rectangles, images, barcodes, detect 3d objects etc...). However we don't have any way to detect and track hands at the moment.
I'm sure that iOS 13/next iphones will allow this out of the box, in the way ARKit already allows face tracking with iphone X. But i was wondering how it could be done until then.
I have seen a lot of great articles mixing ARKit and CoreML. Some of them talk about using CoreML to recognize hand gestures (fist, open hand etc...). But i have not seen any article about hand detection and tracking. I didn't really know where to start because i'm a complete newbie in the field of Machine Learning. Of course, i have read a lot of articles about how easy it is to use CoreML on iOS but most of them stick to using already made CoreML models.
Then i saw a presentation from Will Perkins of Laan Labs at CocoaHeads in Berlin:
Youtube Cocoa Heads Berlin Presentation
This presentation shows how to build a AR footbal game on iOS.
While this presentation does not show any code, it explained me a lot of important concepts about building a CoreML Model to detect the foot. I decided i was going to try to use the same techniques to detect hands.
The starting point is the choice of the algorithm. I had already explored the possibilities offered by CreateML and Turi Create. I didn't see in CreateML any way to make object detection and tracking. I saw it was possible with Turi create however, the models output would be the rectangle of the frame containing the Hand:
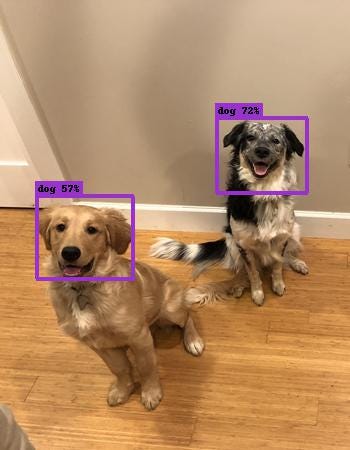
Object detection with Turi Create allows to easily classify and localize objects in an image. The output of the model is the bounding box of the detected objects (dog faces in the above example).
Looking at the documentation of Turi create, it seems really easy to train a model to do Object Detection:
https://github.com/apple/turicreate/tree/master/userguide/object_detection
The documentation explains how to prepare the data. It says you need at least 30 samples per object class, but that for high quality results you need around 200.
I wasn't sure however that detecting the bounding box for the hand would offer enough precision.
That's where Will's presentation helped me. In it, object detection seemed more precise:
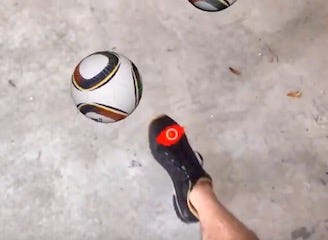
Instead of having the bounding box for the feet, the tip of the feet is identified at pixel level. He said he was using the following project by Akira Sosa:
https://github.com/akirasosa/mobile-semantic-segmentation
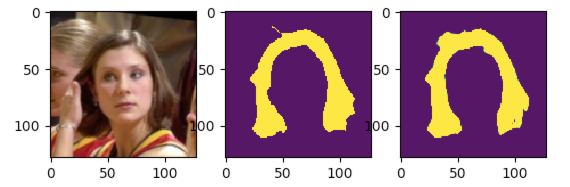
Akira Sosa developed a deep neural network called MobileUNet to do Semantic Segmentation. Semantic segmentation is understanding an image at pixel level (assigning each pixel in the image to an object class). The above project used semantic segmentation to change hair color in a video in real time.
The project uses a framework called PyTorch which is an open source deep learning platform developed by Facebook.
What's interesting for me as a newbie, was that the project also provided Python code to convert the trained model to CoreML, and also it showed the code to use the model on iOS.
So i decided to give it a try. My first task would be to get the data needed to train the model. After a bit of googling i found out that hand detection was a common problem with a lot of research papers with huge datasets. I was a bit lost and was really considering creating my own dataset when i tumbled onto this project:
https://github.com/aurooj/Hand-Segmentation-in-the-Wild
This project provided a dataset called EgoYouTubeHands (EYTH) dataset. This dataset provides images from youtube videos with both images and the needed masks to use as groundtruth annotations:

This dataset seemed perfect to me because it was not too big (around 20mo) compared to others and i thought it would be possible for me to train a model with it on my mac.
I resized the images and masks to 224x224 as input size because as stated in mobile semantic segmentation project from Akira Sosa, pre-trained weight from MobileNetV2 could be used. From my understanding, pre trained model should allow faster learning by providing a base (i think it's called Transfer Learning).
After installing pytorch (using Anaconda) and some needed libraries, i was finally able to start training my model with the EYTH dataset. I used Jupyter notebook to run the train_unet.ipnb file.
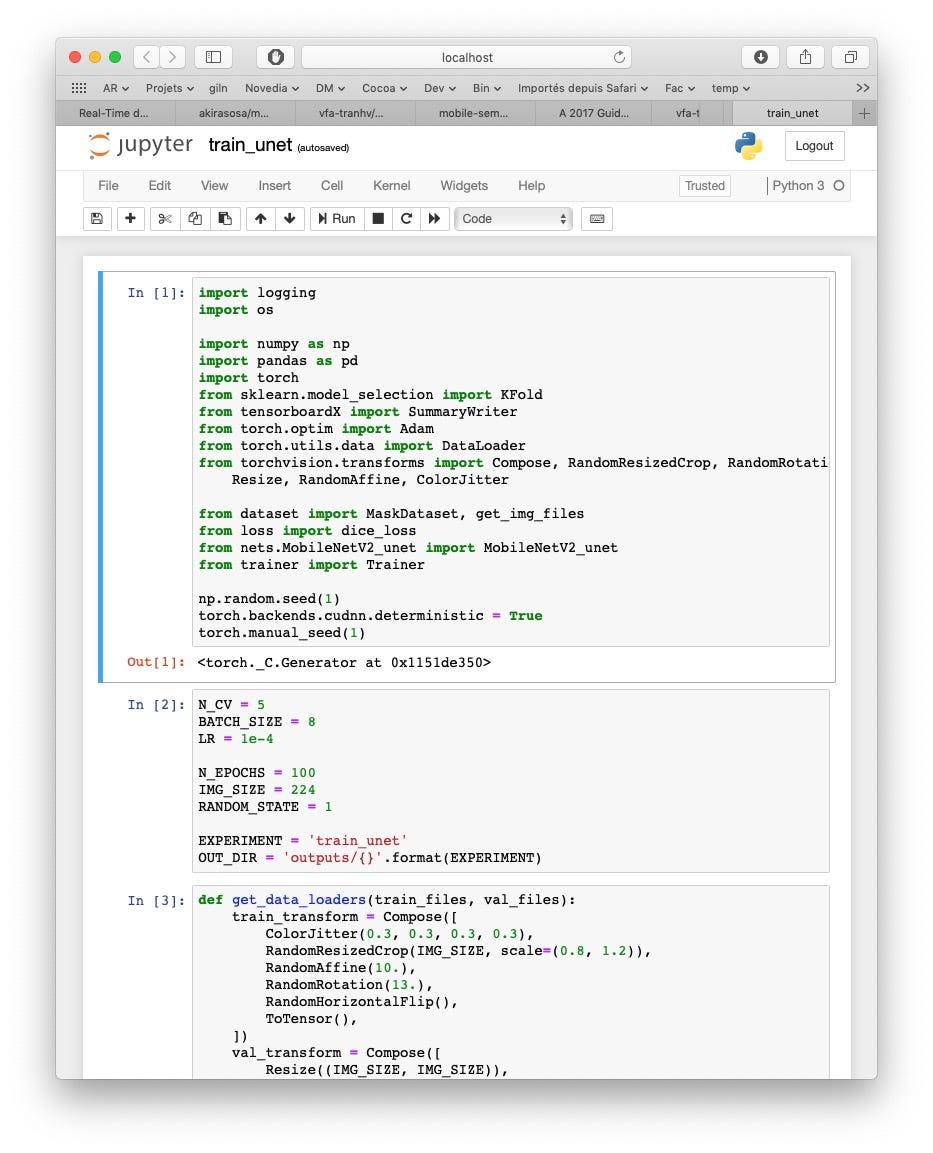
After hitting Cells -> "Run all" you start seeing the results at the bottom:
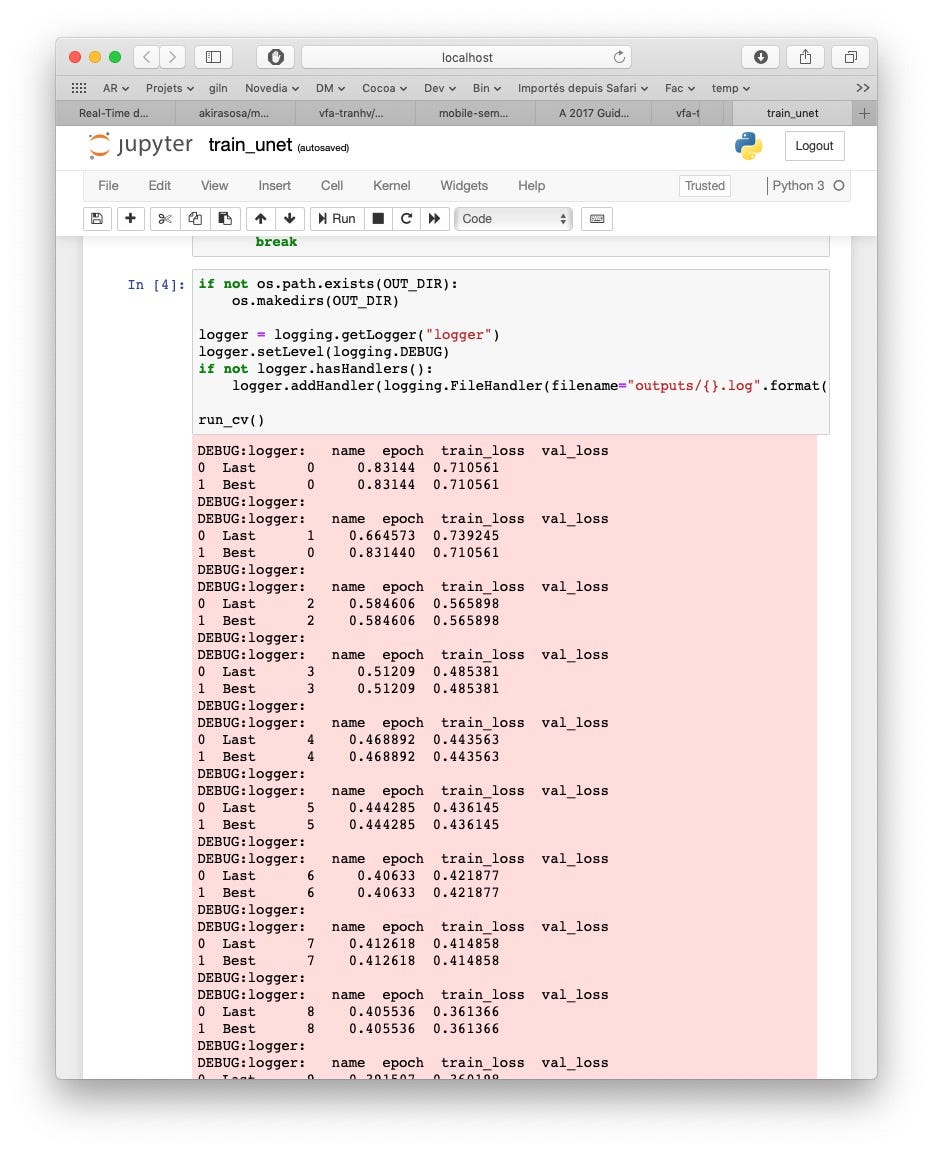
For info, it took me about 10 hours to run 100 epochs on my dual core macbook pro with no GPU. Each run produces a model. So you can start testing on your iphone right after the first run. Every time an epoch produces better results the model is replaced. The model is generated in output/train_unet/0-best.pth
To convert your model to CoreML run:
python coreml_converter.py
This will generate a 0-best.mlmodel file wich is around 19mo and can be used by CoreML on iOS.
To start using your model, start a new Xcode project and drop your mlmodel in it.
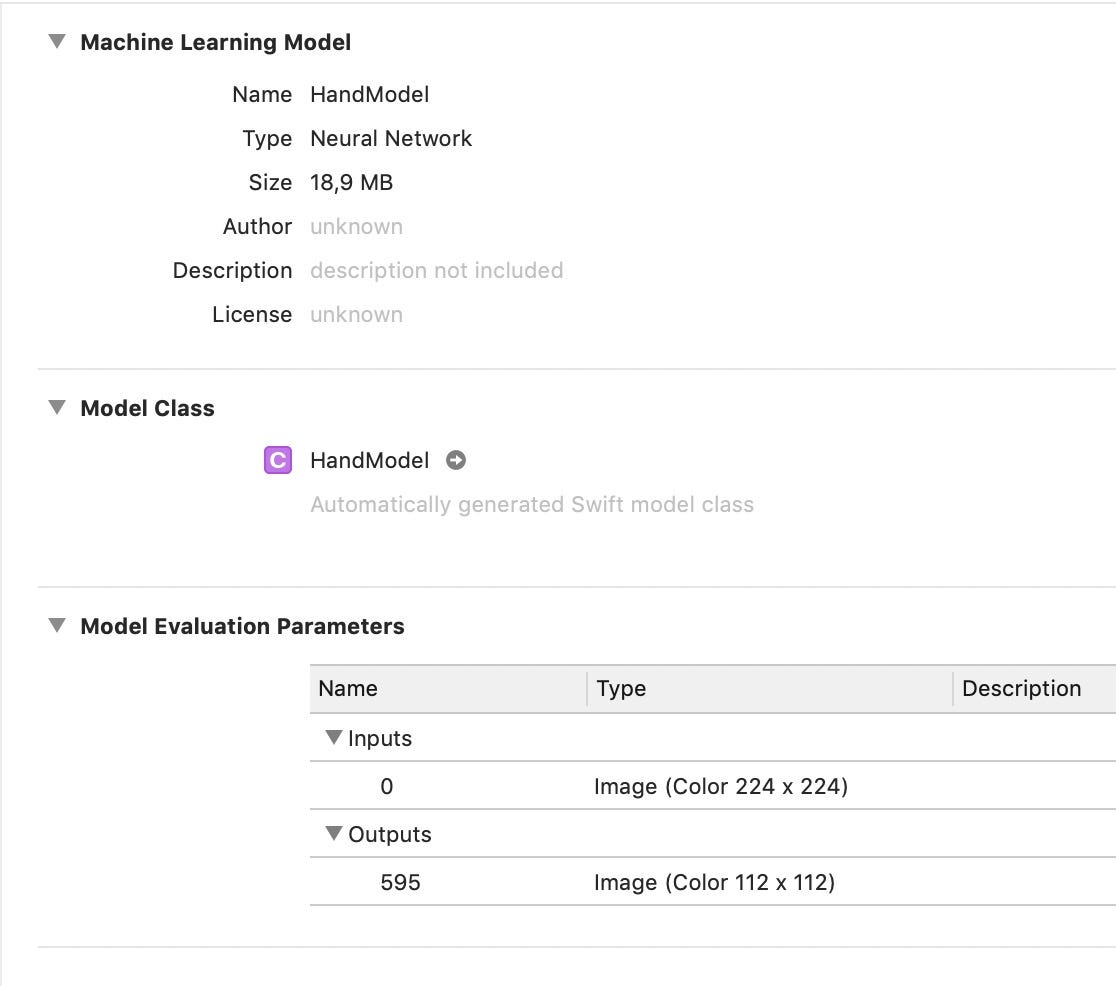
When you inspect your model, you can see that it expects a 224x224 image as input and that it's output is a 112x112 image.
How can we use it?
Let's start by making a new ARViewController. This class will use an ARSCNView as base view.
import ARKit

class ARViewController: UIViewController {
    // MARK: - Variables
    let sceneView = ARSCNView()

    // MARK: - Lifecycle
    override func loadView() {
        super.loadView()

        view = sceneView

        // Create a session configuration
        let configuration = ARWorldTrackingConfiguration()

        // Run the session with the configuration
        sceneView.session.run(configuration)
    }

}
This code is simple. You create an ARSCNView and you assign it to the ViewController View in the loadView method (easier to use than viewDidLoad because you don't have to manage layout of your ARSCNView).
An ARSCNView is a view that combines a SCNScene from SceneKit with an ARSession from ARKit. SceneKit is a 3D framework from Apple that allows to load and display 3D objects in a very simple but powerfull way. It is very complete and easy to use 3D engine with lot of features like physics, lighting, actions etc...
If you provide an ARWorldTrackingConfiguration to the ARSession of the ARSCNView, you should start seeing the camera feed (run on device because it is not supported on the simulator).
Now what we want to do is to run a CoreML request on the video we receive from the ARSceneView to detect the pixels where hands are located. To get the frames of the video we need to handle a delegate from ARSession.
import ARKit

class ARViewController: UIViewController, ARSessionDelegate {
    // MARK: - Variables
    let sceneView = ARSCNView()

    // MARK: - Lifecycle
    override func loadView() {
        super.loadView()

        view = sceneView

        // Create a session configuration
        let configuration = ARWorldTrackingConfiguration()

        // We want to receive the frames from the video
        sceneView.session.delegate = self

        // Run the session with the configuration
        sceneView.session.run(configuration)
    }

    // MARK: - ARSessionDelegate

    func session(_ session: ARSession, didUpdate frame: ARFrame) {
        // This is where we will analyse our frame
    }

}
So in this delegate callback we want to analyse our frame with a CoreML request.
We can read the capturedImage property from the ARFrame. This is a CVPixelBuffer which is perfect because it is what we need for CoreML requests.
We should not forget that we wan't to do real time analysis of the video. The delegate is called 30 times per second. What happens if our frame analysis takes too long (longer than 1/30 seconds)? Well the video will start skipping frames and it will start to look sluggish. To prevent this we don't want to process every single frames, but while we process a frame keep playing the video normally.
// MARK: - ARSessionDelegate
var currentBuffer: CVPixelBuffer?

func session(_: ARSession, didUpdate frame: ARFrame) {
    // We return early if currentBuffer is not nil or the tracking state of camera is not normal
    guard currentBuffer == nil, case .normal = frame.camera.trackingState else {
        return
    }

    // Retain the image buffer for Vision processing.
    currentBuffer = frame.capturedImage

    startDetection()
}

// MARK: - Private functions
private func startDetection() {
    // Here we will do our CoreML request on currentBuffer
    // Release currentBuffer to allow processing next frame
    currentBuffer = nil
}
We declare a currentBuffer variable as optional CVPixelBuffer. In the session didUpdate delegate we assign the capturedImage to this currentBuffer. Notice that we return early if the currentBuffer is not nil. Because this means that the CoreML request has not finished processing yet and we should not start another request.
So now how do we do a CoreML Request?
First we need to import CoreML and Vision frameworks:
import CoreML
import Vision
Then we need to declare our VNCoreMLRequest as a lazy property:
private lazy var predictionRequest: VNCoreMLRequest = {
    // Load the ML model through its generated class and create a Vision request for it.
    do {
        let model = try VNCoreMLModel(for: HandModel().model)
        let request = VNCoreMLRequest(model: model)

        // This setting determines if images are scaled or cropped to fit our 224x224 input size. Here we try scaleFill so we don't cut part of the image.
        request.imageCropAndScaleOption = VNImageCropAndScaleOption.scaleFill
        return request
    } catch {
        fatalError("can't load Vision ML model: \(error)")
    }
}()
To use this prediction request we use a VNRequestHandler:
let visionQueue = DispatchQueue(label: "com.viseo.ARML.visionqueue")

private func startDetection() {
    // To avoid force unwrap in VNImageRequestHandler
    guard let buffer = currentBuffer else { return }

    // Right orientation because the pixel data for image captured by an iOS device is encoded in the camera sensor's native landscape orientation
    let requestHandler = VNImageRequestHandler(cvPixelBuffer: buffer, orientation: .right)

    // We perform our CoreML Requests asynchronously.
    visionQueue.async {
        // Run our CoreML Request
        try? requestHandler.perform([self.predictionRequest])

        guard let observation = self.predictionRequest.results?.first as? VNPixelBufferObservation else {
            fatalError("Unexpected result type from VNCoreMLRequest")
        }

        // The resulting image (mask) is available as observation.pixelBuffer
        // Release currentBuffer when finished to allow processing next frame
        self.currentBuffer = nil
    }
}
So after performing the requestHandler, we have our result available in observation.pixelBuffer.
Before we go any further we need to refactor this because we start to have to many responsibilities in our ViewController.
We need to take the CoreML processing out of the ViewController. To do this we create a new class called HandDetector:
import CoreML
import Vision

public class HandDetector {
    // MARK: - Variables
    private let visionQueue = DispatchQueue(label: "com.viseo.ARML.visionqueue")

    private lazy var predictionRequest: VNCoreMLRequest = {
        // Load the ML model through its generated class and create a Vision request for it.
        do {
            let model = try VNCoreMLModel(for: HandModel().model)
            let request = VNCoreMLRequest(model: model)

            // This setting determines if images are scaled or cropped to fit our 224x224 input size. Here we try scaleFill so we don't cut part of the image.
            request.imageCropAndScaleOption = VNImageCropAndScaleOption.scaleFill
            return request
        } catch {
            fatalError("can't load Vision ML model: \(error)")
        }
    }()

    // MARK: - Public functions
    public func performDetection(inputBuffer: CVPixelBuffer, completion: @escaping (_ outputBuffer: CVPixelBuffer?, _ error: Error?) -> Void) {
        // Right orientation because the pixel data for image captured by an iOS device is encoded in the camera sensor's native landscape orientation
        let requestHandler = VNImageRequestHandler(cvPixelBuffer: inputBuffer, orientation: .right)

        // We perform our CoreML Requests asynchronously.
        visionQueue.async {
            // Run our CoreML Request
            do {
                try requestHandler.perform([self.predictionRequest])

                guard let observation = self.predictionRequest.results?.first as? VNPixelBufferObservation else {
                    fatalError("Unexpected result type from VNCoreMLRequest")
                }

                // The resulting image (mask) is available as observation.pixelBuffer
                completion(observation.pixelBuffer, nil)
            } catch {
                completion(nil, error)
            }
        }
    }
}
This HandDetector initialises our CoreML model and is responsible for performing the CoreML Request on a pixelBuffer. This is done in the performDetection function which takes an input pixelBuffer as an input and returns an output pixelBuffer in a completion Handler.
Remember that our result is a 112x112 pixel buffer with white pixels for the detected hand and black pixels for the background.
To debug our mlmodel, we will display this buffer in an imageView that we add in our Loadview function:
var previewView = UIImageView()

// MARK: - Lifecycle
override func loadView() {
    super.loadView()

    view = sceneView

    // Create a session configuration
    let configuration = ARWorldTrackingConfiguration()

    // We want to receive the frames from the video
    sceneView.session.delegate = self

    // Run the session with the configuration
    sceneView.session.run(configuration)

    view.addSubview(previewView)

    previewView.translatesAutoresizingMaskIntoConstraints = false
    previewView.bottomAnchor.constraint(equalTo: view.bottomAnchor).isActive = true
    previewView.trailingAnchor.constraint(equalTo: view.trailingAnchor).isActive = true
}
and here is how we get the output image:
// MARK: - Private functions
let handDetector = HandDetector()

private func startDetection() {
    // To avoid force unwrap in VNImageRequestHandler
    guard let buffer = currentBuffer else { return }

    handDetector.performDetection(inputBuffer: buffer) { outputBuffer, _ in
        // Here we are on a background thread
        var previewImage: UIImage?

        defer {
            DispatchQueue.main.async {
                self.previewView.image = previewImage
                // Release currentBuffer when finished to allow processing next frame
                self.currentBuffer = nil
            }
        }

        guard let outBuffer = outputBuffer else {
            return
        }

        // Create UIImage from CVPixelBuffer
        previewImage = UIImage(ciImage: CIImage(cvPixelBuffer: outBuffer))
    }
}
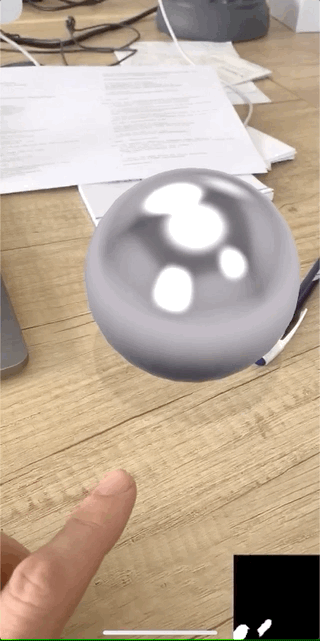
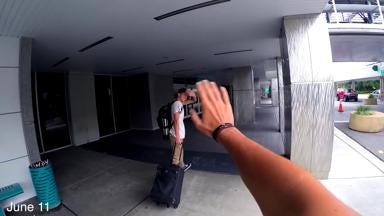
As a result we see at the bottom the white pixels detected by the CoreML request as a hand:
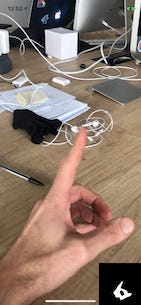
We can see the result is not perfect, however it will be good enough for what we want to achieve.
Now we are going to work with SceneKit to add virtual objects (balls) in a 3D space. We will use ARKit to anchor this virtual 3D space in the real world we see through the iphone's camera to give the illusion that the virual object is real. For more info about world tracking in ARKit:
With ARKit, the camera can detect feature points which are notable features detected in the camera image. As stated by Apple:
"Their positions in 3D world coordinate space are extrapolated as part of the image analysis that ARKit performs in order to accurately track the device's position, orientation, and movement. Taken together, these points loosely correlate to the contours of real-world objects in view of the camera." - Apple
When you enable Plane detection in ARKit, it will analyse those feature points, and if some of them are co-planar, it will use them to estimate the shape and position of the surface.
In our code we use an ARSCNView. Which is a SCNView from SceneKit backed by an ARSession from ARKit. ARSCNView can automatically detect feature points (they are called ARAnchor), and planes (ARPlaneAnchor).
To enable plane detection, we just need to configure our ARSession to say we wan't to detect horizontal planes:
// Create a session configuration
let configuration = ARWorldTrackingConfiguration()

// Enable Horizontal plane detection
configuration.planeDetection = .horizontal

// We want to receive the frames from the video
sceneView.session.delegate = self

// Run the session with the configuration
sceneView.session.run(configuration)

// The delegate is used to receive ARAnchors when they are detected.
sceneView.delegate = self
Of course our ARViewController must conform to ARSCNViewDelegate protocol:
class ARViewController: UIViewController, ARSessionDelegate, ARSCNViewDelegate {
We implement this delegate callback to be notified when the ARSCNView detects an ARAnchor with it's assigned SCNNode:
// MARK: - ARSCNViewDelegate

func renderer(_ renderer: SCNSceneRenderer, didAdd node: SCNNode, for anchor: ARAnchor) {

}
An SCNNode is used by SceneKit as an element of a Scene graph (Hierarchy of SCNNodes). The node object by itself has no visible content. It only represents a coodinate space transform (position, orientation, scale) relative to it's parent.
An ARSCNView scene has a rootNode, and automatically matches SceneKit Space to the real world.
Since we enabled plane detection in ARKit, we wan't to create virtual planes that match the detected planes in ARKit. This way it will give the illusion that we are really placing virtual objects on a real table.
To do this we create a PlaneNode class:
import ARKit
import SceneKit

public class PlaneNode: SCNNode {

    // MARK: - Public functions
    public func update(from planeAnchor: ARPlaneAnchor) {
        // We need to create a new geometry each time because it does not seem to update correctly for physics
        guard let device = MTLCreateSystemDefaultDevice(),
            let geom = ARSCNPlaneGeometry(device: device) else {
                fatalError()
        }

        geom.firstMaterial?.diffuse.contents = UIColor.blue.withAlphaComponent(0.3)
        geom.update(from: planeAnchor.geometry)

        // We modify our plane geometry each time ARKit updates the shape of an existing plane
        geometry = geom
}
A planeNode has a special type of geometry available since ARKit 1.5 which is an ARSCNPlaneGeometry. This geometry is created by ARKit when it detects a plane so that the shape is as close as possible to the real plane (This way we can have round tables for exemple).
We need to update this geometry each time ARKit detects a change in the geometry of the detected plane (as we look around):
// MARK: - ARSCNViewDelegate
func renderer(_: SCNSceneRenderer, nodeFor anchor: ARAnchor) -> SCNNode? {
    guard let _ = anchor as? ARPlaneAnchor else { return nil }

    // We return a special type of SCNNode for ARPlaneAnchors
    return PlaneNode()
}

func renderer(_: SCNSceneRenderer, didAdd node: SCNNode, for anchor: ARAnchor) {
    guard let planeAnchor = anchor as? ARPlaneAnchor,
        let planeNode = node as? PlaneNode else {
        return
    }
    planeNode.update(from: planeAnchor)
}

func renderer(_: SCNSceneRenderer, didUpdate node: SCNNode, for anchor: ARAnchor) {
    guard let planeAnchor = anchor as? ARPlaneAnchor,
        let planeNode = node as? PlaneNode else {
        return
    }
    planeNode.update(from: planeAnchor)
}
Here is the result:
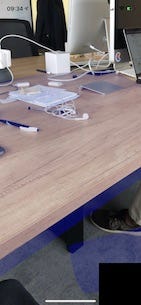
In the above screenshot we can see that ARKit has detected 2 planes (one for the table and one for the ground). We are coloring them in transparent blue for debugging purposes. We also see that when we move our camera, the planes shapes grow bigger as ARKit detects them.
Now we are going to place balls onto those planes. We create a BallNode class:
import SceneKit

public class BallNode: SCNNode {
    // MARK: - Lifecycle
    public convenience init(radius: CGFloat) {
        self.init()
        let sphere = SCNSphere(radius: radius)

        // We create a Physically Based Rendering material
        let reflectiveMaterial = SCNMaterial()
        reflectiveMaterial.lightingModel = .physicallyBased
        // We want our ball to look metallic
        reflectiveMaterial.metalness.contents = 1.0
        // And shiny
        reflectiveMaterial.roughness.contents = 0.0
        sphere.firstMaterial = reflectiveMaterial

        self.geometry = sphere
    }
We want to add the balls to the scene when we tap on the screen. We add a tap gesture recognizer to our view:
sceneView.addGestureRecognizer(UITapGestureRecognizer(target: self, action: #selector(viewDidTap(recognizer:))))
And we handle the selector:
// MARK: - Actions
@objc func viewDidTap(recognizer: UITapGestureRecognizer) {
    // We get the tap location as a 2D Screen coordinate
    let tapLocation = recognizer.location(in: sceneView)

    // To transform our 2D Screen coordinates to 3D screen coordinates we use hitTest function
    let hitTestResults = sceneView.hitTest(tapLocation, types: .existingPlaneUsingExtent)

    // We cast a ray from the point tapped on screen, and we return any intersection with existing planes
    guard let hitTestResult = hitTestResults.first else { return }

    let ball = BallNode(radius: 0.05)

    // We place the ball at hit point
    ball.simdTransform = hitTestResult.worldTransform
    // We place it slightly (5cm) above the plane
    ball.position.y += 0.05

    // We add the node to the scene
    sceneView.scene.rootNode.addChildNode(ball)
}
We enable defaultLighting on the sceneview:
sceneView.autoenablesDefaultLighting = true
And here is the result:
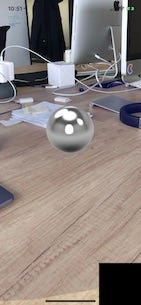
We can see our ball looks nice and shiny. By enabling the default lighting, SceneKit also enabled automatic Environment Texturing. This means that the reflection on the ball is calculated automatically from the environment to add more illusion of reality.
Now let's add Physics so our ball falls on the table. We add this line to the BallNode Init:
// We assign a dynamic physics body to our ball
physicsBody = SCNPhysicsBody(type: .dynamic, shape: nil)
and modify our update function for the PlaneNode:
public func update(from planeAnchor: ARPlaneAnchor) {
    // We need to create a new geometry each time because it does not seem to update correctly for physics
    guard let device = MTLCreateSystemDefaultDevice(),
        let geom = ARSCNPlaneGeometry(device: device) else {
            fatalError()
    }

    geom.firstMaterial?.diffuse.contents = UIColor.blue.withAlphaComponent(0.3)
    geom.update(from: planeAnchor.geometry)

    // We modify our plane geometry each time ARKit updates the shape of an existing plane
    geometry = geom

    // We have to specify we want to use the bounding box or it does not work
    let shape = SCNPhysicsShape(geometry: geom, options: [SCNPhysicsShape.Option.type: SCNPhysicsShape.ShapeType.boundingBox])

    physicsBody = SCNPhysicsBody(type: .static, shape: shape)
}
Now the balls fall and roll on the table!
There is a little detail that can be added for even more realism: Dynamic shadows. Apple explained how to do this during 2017 wwdc.
We modify our planeNode material:
// This allows the material to be invisible but still receive shadows and perform occlusion (hide objects behind them).
let material = SCNMaterial()
material.lightingModel = .constant
material.writesToDepthBuffer = true
material.colorBufferWriteMask = []
geom.firstMaterial = material

geom.update(from: planeAnchor.geometry)
And we create a new custom node: SpotlightNode:
import SceneKit

public class SpotlightNode: SCNNode {

    // MARK: - Lifecycle
    public override init() {
        super.init()
        commonInit()
    }

    required init?(coder aDecoder: NSCoder) {
        super.init(coder: aDecoder)
        commonInit()
    }

    private func commonInit() {
        let spotLight = SCNLight()
        // used to cast shadows
        spotLight.type = .directional
        spotLight.shadowMode = .deferred
        spotLight.castsShadow = true
        spotLight.shadowRadius = 100.0
        spotLight.shadowColor = UIColor(red: 0.0, green: 0.0, blue: 0.0, alpha: 0.2)

        light = spotLight
        // Light is pointing toward the ground
        eulerAngles = SCNVector3(-Float.pi / 2, 0, 0)
    }
}
Then we add our spotlight to the scene 10 meters above us:
// Add spotlight to cast shadows
let spotlightNode = SpotlightNode()
spotlightNode.position = SCNVector3(10, 10, 0)
sceneView.scene.rootNode.addChildNode(spotlightNode)
Little details really help fake your brains into believing the ball is really resting on the table:

So now back to our hand. We want to be able to push this ball with our finger. What we have from our CoreML request is a 112x112 pixelBuffer with black pixels for background and white pixels for hands when they are detected. How can we translate this to our 3d world coordinates?
First we have to find the top most coordinate for our hand. This will be the point we take into account to interact with our virtual world.
We have to work on our PixelBuffer to do this.
import CoreVideo

extension CVPixelBuffer {
    func searchTopPoint() -> CGPoint? {
        // Get width and height of buffer
        let width = CVPixelBufferGetWidth(self)
        let height = CVPixelBufferGetHeight(self)

        let bytesPerRow = CVPixelBufferGetBytesPerRow(self)

        // Lock buffer
        CVPixelBufferLockBaseAddress(self, CVPixelBufferLockFlags(rawValue: 0))

        // Unlock buffer upon exiting
        defer {
            CVPixelBufferUnlockBaseAddress(self, CVPixelBufferLockFlags(rawValue: 0))
        }

        var returnPoint: CGPoint?

        var whitePixelsCount = 0

        if let baseAddress = CVPixelBufferGetBaseAddress(self) {
            let buffer = baseAddress.assumingMemoryBound(to: UInt8.self)

            // we look at pixels from bottom to top
            for y in (0 ..< height).reversed() {
                for x in (0 ..< width).reversed() {
                    // We look at top groups of 5 non black pixels
                    let pixel = buffer[y * bytesPerRow + x * 4]
                    let abovePixel = buffer[min(y + 1, height) * bytesPerRow + x * 4]
                    let belowPixel = buffer[max(y - 1, 0) * bytesPerRow + x * 4]
                    let rightPixel = buffer[y * bytesPerRow + min(x + 1, width) * 4]
                    let leftPixel = buffer[y * bytesPerRow + max(x - 1, 0) * 4]

                    if pixel > 0 && abovePixel > 0 && belowPixel > 0 && rightPixel > 0 && leftPixel > 0 {
                        let newPoint = CGPoint(x: x, y: y)
                        // we return a normalized point (0-1)
                        returnPoint = CGPoint(x: newPoint.x / CGFloat(width), y: newPoint.y / CGFloat(height))
                        whitePixelsCount += 1
                    }
                }
            }
        }

        // We count the number of pixels in our frame. If the number is too low then we return nil because it means it's detecting a false positive
        if whitePixelsCount < 10 {
            returnPoint = nil
        }

        return returnPoint
    }
}
The above extension to CVPixelBuffer returns the top most non black pixel or nil.
Now we create a TouchNode class. This invisible touch node will represent our finger in 3d space and will be used for physics to push the ball around.
import SceneKit

public class TouchNode: SCNNode {

    // MARK: - Lifecycle
    public override init() {
        super.init()
        commonInit()
    }

    public required init?(coder aDecoder: NSCoder) {
        super.init(coder: aDecoder)
        commonInit()
    }

    private func commonInit() {
        // Touch node configuration
        let sphere = SCNSphere(radius: 0.01)

        let material = SCNMaterial()
        material.diffuse.contents = UIColor.red

        // Uncomment to see the node for debugging purposes
        //geometry = sphere
        sphere.firstMaterial = material

        let sphereShape = SCNPhysicsShape(geometry: sphere, options: nil)

        physicsBody = SCNPhysicsBody(type: .kinematic, shape: sphereShape)
    }
}
To use it we have to go back to our detection function:
private func startDetection() {
// To avoid force unwrap in VNImageRequestHandler
guard let buffer = currentBuffer else { return }

handDetector.performDetection(inputBuffer: buffer) { outputBuffer, _ in
    // Here we are on a background thread
    var previewImage: UIImage?
    var normalizedFingerTip: CGPoint?

    defer {
        DispatchQueue.main.async {
            self.previewView.image = previewImage

            // Release currentBuffer when finished to allow processing next frame
            self.currentBuffer = nil

            self.touchNode.isHidden = true

            guard let tipPoint = normalizedFingerTip else {
                return
            }

            // We use a coreVideo function to get the image coordinate from the normalized point
            let imageFingerPoint = VNImagePointForNormalizedPoint(tipPoint, Int(self.view.bounds.size.width), Int(self.view.bounds.size.height))

            // And here again we need to hitTest to translate from 2D coordinates to 3D coordinates
            let hitTestResults = self.sceneView.hitTest(imageFingerPoint, types: .existingPlaneUsingExtent)
            guard let hitTestResult = hitTestResults.first else { return }

            // We position our touchNode slighlty above the plane (1cm).
            self.touchNode.simdTransform = hitTestResult.worldTransform
            self.touchNode.position.y += 0.01
            self.touchNode.isHidden = false

        }
    }

    guard let outBuffer = outputBuffer else {
        return
    }

    // Create UIImage from CVPixelBuffer
    previewImage = UIImage(ciImage: CIImage(cvPixelBuffer: outBuffer))

    normalizedFingerTip = outBuffer.searchTopPoint()

}
We use our search function to get the top most white pixel in our PixelBuffer. Then we convert it to the same coordinates as our screen. And finally we use HitTesting to convert it to 3d Coordinates by placing our touchNode slightly above the detected plane.
And here is the result: